Uploading Data by Using Sql Server Integration Services
This browser is no longer supported.
Upgrade to Microsoft Border to take advantage of the latest features, security updates, and technical support.
Load information into SQL Server or Azure SQL Database with SQL Server Integration Services (SSIS)
APPLIES TO: ![]() SQL Server
SQL Server ![]() SSIS Integration Runtime in Azure Data Manufactory
SSIS Integration Runtime in Azure Data Manufactory
Create a SQL Server Integration Services (SSIS) package to load data into SQL Server or Azure SQL Database. Y'all can optionally restructure, transform, and cleanse the data equally information technology passes through the SSIS data flow.
This commodity shows yous how to do the following things:
- Create a new Integration Services project in Visual Studio.
- Design an SSIS package that loads data from the source into the destination.
- Run the SSIS package to load the data.
Basic concepts
The package is the bones unit of work in SSIS. Related packages are grouped in projects. You lot create projects and design packages in Visual Studio with SQL Server Data Tools. The blueprint process is a visual process in which yous elevate and driblet components from the Toolbox to the blueprint surface, connect them, and set their properties. Afterward you terminate your packet, you lot can run information technology, and y'all can optionally deploy it to SQL Server or SQL Database for comprehensive management, monitoring, and security.
A detailed introduction to SSIS is across the scope of this commodity. To learn more than, see the post-obit articles:
-
SQL Server Integration Services
-
How to Create an ETL Package
About the solution
The solution is a typical package which uses a Data Flow task that contains a source and a destination. This arroyo supports a wide range of data sources, including SQL Server and Azure SQL Database.
This tutorial uses SQL Server equally the information source. SQL Server runs on bounds or on an Azure virtual machine.
To connect to SQL Server and to SQL Database, yous tin use an ADO.NET connection manager and source and destination, or an OLE DB connection manager and source and destination. This tutorial uses ADO.NET because it has the fewest configuration options. OLE DB may provide slightly better functioning than ADO.Internet.
Equally a shortcut, you lot can use the SQL Server Import and Consign Magician to create the bones package. So, save the package, and open it in Visual Studio or SSDT to view and customize it. For more info, see Import and Export Data with the SQL Server Import and Export Wizard.
Prerequisites
To step through this tutorial, you need the following things:
-
SQL Server Integration Services (SSIS). SSIS is a component of SQL Server and requires a licensed version, or the developer or evaluation version, of SQL Server. To go an evaluation version of SQL Server, see Evaluate SQL Server.
-
Visual Studio (optional). To become the gratuitous Visual Studio Community Edition, run into Visual Studio Customs. If you don't want to install Visual Studio, y'all can install SQL Server Data Tools (SSDT) simply. SSDT installs a version of Visual Studio with limited functionality.
-
SQL Server Data Tools for Visual Studio (SSDT). To get SQL Server Data Tools for Visual Studio, encounter Download SQL Server Information Tools (SSDT).
-
This tutorial connects to a SQL Server or a SQL Database instance and loads information into it. Y'all have to have permission to connect, to create a table, and to load data on one of the following:
- An Azure SQL Database database. For more info, see Azure SQL Database.
or - A SQL Server instance. SQL Server runs on premises or on an Azure virtual machine. To download a free evaluation or programmer edition of SQL Server, come across SQL Server downloads.
- An Azure SQL Database database. For more info, see Azure SQL Database.
-
Sample data. This tutorial uses sample information stored in SQL Server in the AdventureWorks sample database as the source information. To get the AdventureWorks sample database, come across AdventureWorks Sample Databases.
-
A firewall rule if you're loading data into SQL Database. You take to create a firewall rule on SQL Database with the IP address of your local computer earlier you tin upload information to the SQL Database.
Create a new Integration Services project
- Launch Visual Studio.
- On the File card, select New | Project.
- Navigate to the Installed | Templates | Business Intelligence | Integration Services project types.
- Select Integration Services Project. Provide values for Name and Location, and so select OK.
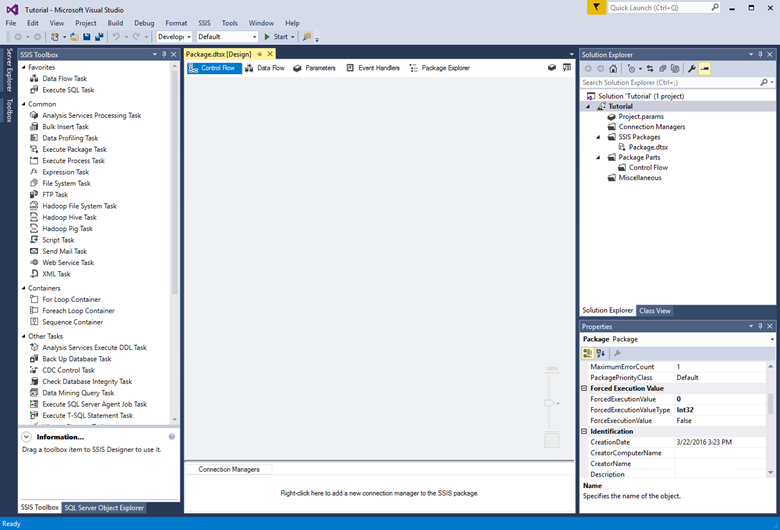
Visual Studio opens and creates a new Integration Services (SSIS) project. And so Visual Studio opens the designer for the single new SSIS package (Package.dtsx) in the projection. You lot see the following screen areas:
-
On the left, the Toolbox of SSIS components.
-
In the center, the design surface, with multiple tabs. You typically use at to the lowest degree the Control Flow and the Data Flow tabs.
-
On the right, the Solution Explorer and the Properties panes.
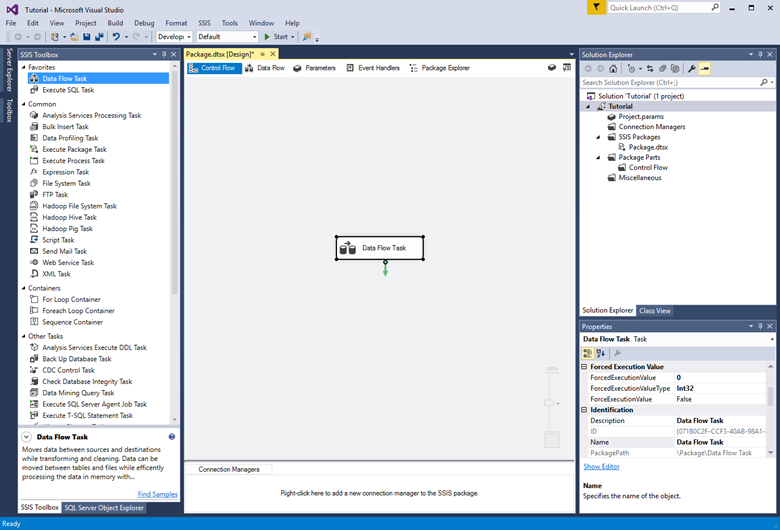
Create the bones data flow
-
Drag a Data Flow Job from the Toolbox to the center of the design surface (on the Control Flow tab).
-
Double-click the Data Flow Task to switch to the Data Menses tab.
-
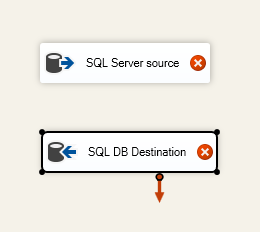
From the Other Sources list in the Toolbox, elevate an ADO.NET Source to the design surface. With the source adapter even so selected, change its name to SQL Server source in the Backdrop pane.
-
From the Other Destinations list in the Toolbox, elevate an ADO.NET Destination to the design surface under the ADO.Net Source. With the destination adapter all the same selected, change its name to SQL destination in the Properties pane.
Configure the source adapter
-
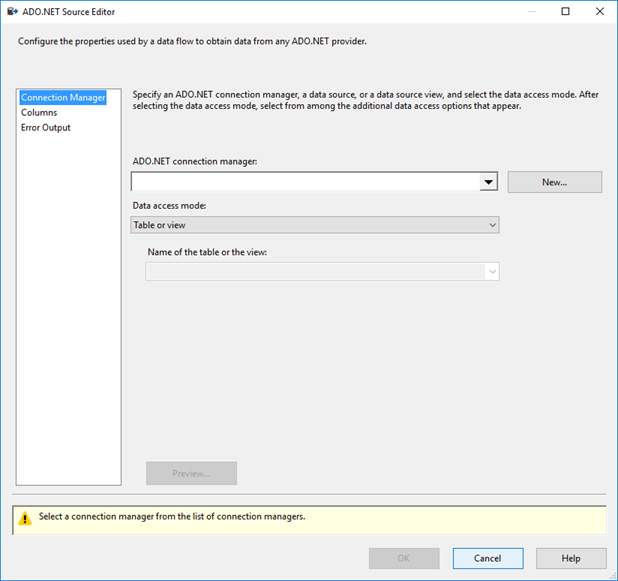
Double-click the source adapter to open the ADO.Net Source Editor.
-
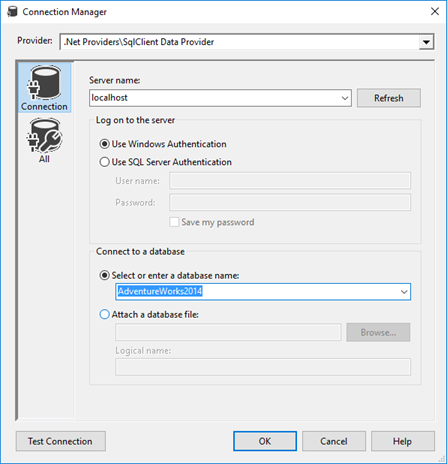
On the Connection Managing director tab of the ADO.Internet Source Editor, click the New button next to the ADO.NET connectedness manager list to open the Configure ADO.NET Connection Manager dialog box and create connectedness settings for the SQL Server database from which this tutorial loads information.

-
In the Configure ADO.NET Connection Managing director dialog box, click the New button to open the Connection Manager dialog box and create a new data connection.
-
In the Connection Director dialog box, exercise the following things.
-
For Provider, select the SqlClient Data Provider.
-
For Server name, enter the SQL Server proper noun.
-
In the Log on to the server department, select or enter hallmark information.
-
In the Connect to a database department, select the AdventureWorks sample database.
-
Click Test Connection.

-
In the dialog box that reports the results of the connectedness test, click OK to return to the Connection Manager dialog box.
-
In the Connectedness Manager dialog box, click OK to return to the Configure ADO.Cyberspace Connexion Manager dialog box.
-
-
In the Configure ADO.NET Connexion Manager dialog box, click OK to return to the ADO.NET Source Editor.
-
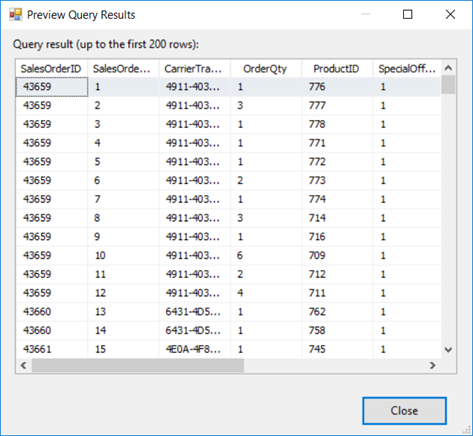
In the ADO.Internet Source Editor, in the Proper name of the table or the view list, select the Sales.SalesOrderDetail table.

-
Click Preview to run into the first 200 rows of data in the source tabular array in the Preview Query Results dialog box.
-
In the Preview Query Results dialog box, click Close to return to the ADO.NET Source Editor.
-
In the ADO.Internet Source Editor, click OK to cease configuring the data source.
Connect the source adapter to the destination adapter
-
Select the source adapter on the blueprint surface.
-
Select the blue arrow that extends from the source adapter and drag it to the destination editor until it snaps into place.
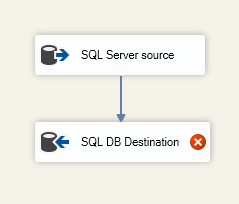
In a typical SSIS bundle, y'all utilise a number of other components from the SSIS Toolbox in between the source and the destination to restructure, transform, and cleanse your data as it passes through the SSIS data menstruation. To keep this example as unproblematic as possible, we're connecting the source directly to the destination.
Configure the destination adapter
-
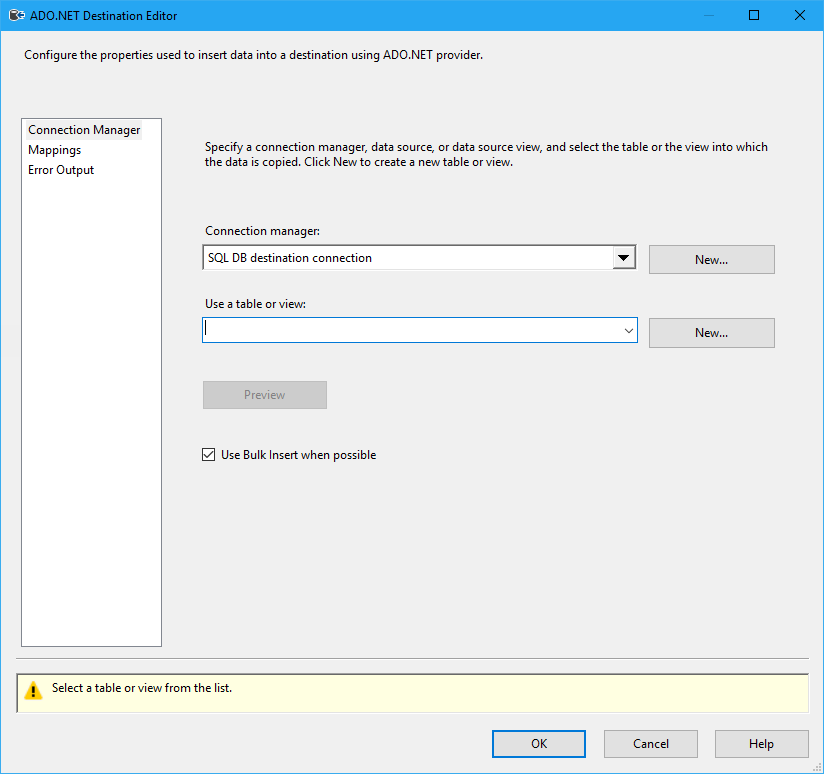
Double-click the destination adapter to open the ADO.NET Destination Editor.
-
On the Connection Managing director tab of the ADO.NET Destination Editor, click the New button side by side to the Connection manager list to open up the Configure ADO.Cyberspace Connection Manager dialog box and create connection settings for the database into which this tutorial loads data.
-
In the Configure ADO.NET Connection Manager dialog box, click the New button to open up the Connection Director dialog box and create a new information connection.
-
In the Connection Manager dialog box, do the following things.
- For Provider, select the SqlClient Information Provider.
- For Server proper noun, enter the proper name of the SQL Server or of the SQL Database server.
- In the Log on to the server section, select Utilise SQL Server hallmark and enter hallmark data.
- In the Connect to a database section, select an existing database. a. Click Test Connexion. b. In the dialog box that reports the results of the connectedness test, click OK to render to the Connection Manager dialog box. c. In the Connection Manager dialog box, click OK to return to the Configure ADO.NET Connection Manager dialog box.
-
In the Configure ADO.NET Connection Manager dialog box, click OK to return to the ADO.Internet Destination Editor.
-
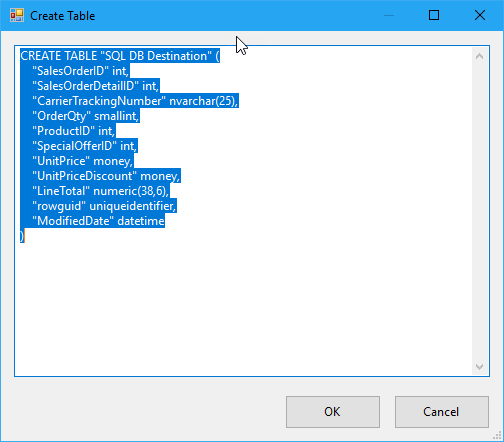
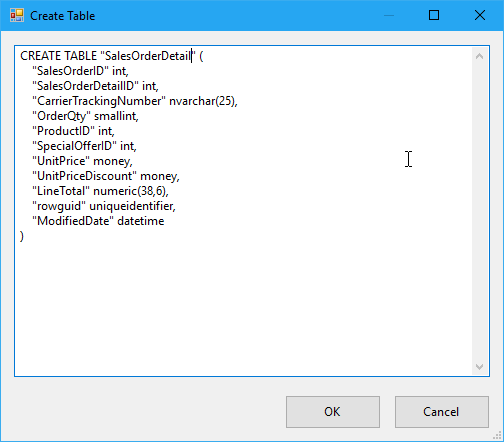
In the ADO.Cyberspace Destination Editor, click New side by side to the Employ a table or view listing to open the Create Table dialog box to create a new destination table with a column listing that matches the source table.
-
In the Create Tabular array dialog box, do the following things.
-
Alter the name of the destination table to SalesOrderDetail.
-
Click OK to create the table and return to the ADO.Internet Destination Editor.
-
-
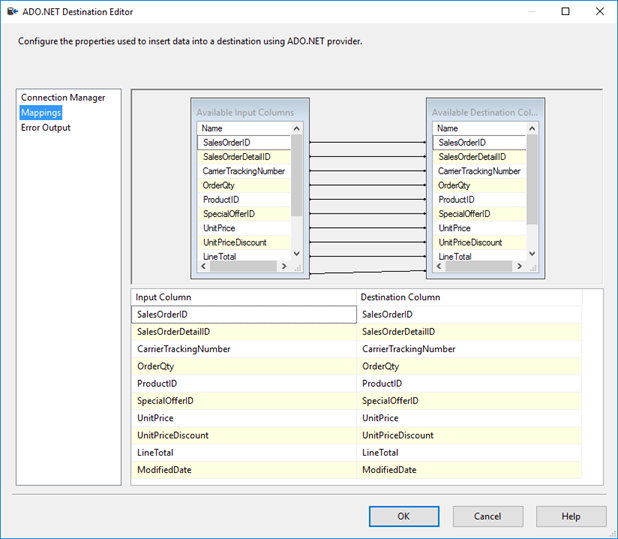
In the ADO.NET Destination Editor, select the Mappings tab to run into how columns in the source are mapped to columns in the destination.
-
Click OK to finish configuring the destination.
Run the package to load the data
Run the bundle by clicking the Start button on the toolbar or by selecting one of the Run options on the Debug menu.
The following paragraphs draw what you see if you created the parcel with the 2nd pick described in this article, that is, with a information flow containing a source and destination.
As the bundle begins to run, you lot come across yellow spinning wheels to betoken activity equally well as the number of rows processed so far.

When the package has finished running, you see green check marks to indicate success too every bit the full number of rows of data loaded from the source to the destination.
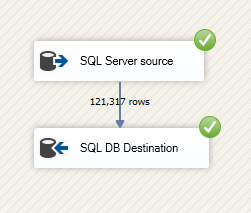
Congratulations! You've successfully used SQL Server Integration Services to load data into SQL Server or Azure SQL Database.
Next steps
-
Learn how to debug and troubleshoot your packages right in the blueprint environs. Start here: Troubleshooting Tools for Package Development.
-
Learn how to deploy your SSIS projects and packages to Integration Services Server or to another storage location. Start here: Deployment of Projects and Packages.
Source: https://docs.microsoft.com/en-us/sql/integration-services/load-data-to-sql-database-with-ssis
0 Response to "Uploading Data by Using Sql Server Integration Services"
Post a Comment